Building an App to Generate Gif Quizzes
A walk through my design and development process for building gifbanana.com, why I built it, and how much it cost me.
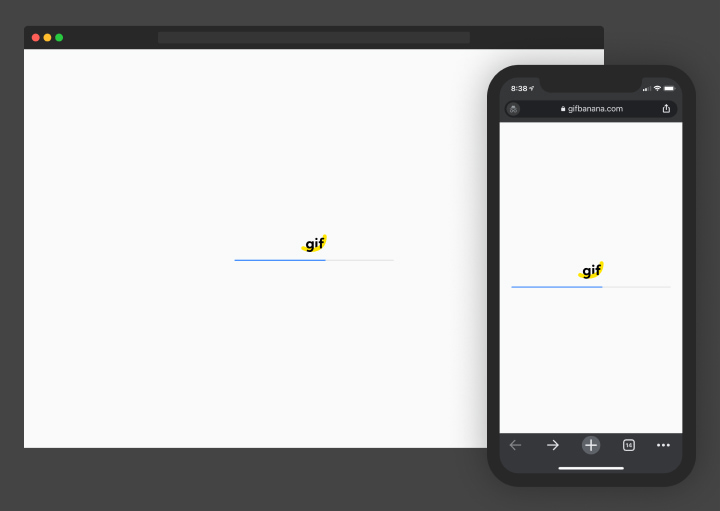
What is GifBanana.com?
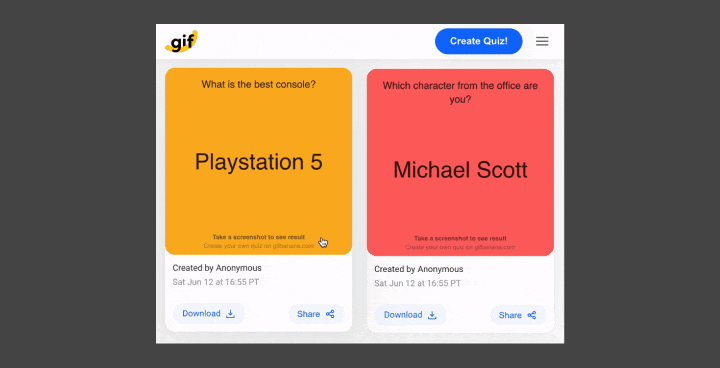
GifBanana is a website where you can create animated interactive gif quizzes. These quizzes usually have a funny question and a list of answers (up to 10). Answers in the gif change quickly to make it a little challenging to see the answers.
Below is an example of a fun quiz generated using gifbanana.com.

How does it work?
It's pretty straightforward, you create a gif by providing a question and a set of answers, choose a color, then click generate the gif, and finally, you send the generated gif to your friends. Once your friends receive the gif, they should snap a screenshot and share the answer they got with you!
Why did I build it?
One of my friends once shared an interactive gif image in a Whatsapp group and asked everyone in that group to share a screenshot of their result. And once everyone shared a screenshot of their answer, we had a good laugh, as all the answers were pretty silly!
The game was interesting to me, it was fun, simple, and engaging! And this got really curious about how it was made. I decided to take this as a challenge and see if I can build a web app to generate this kind of quizzes!
At that time, I was looking for a new project to work on, and this one was a great opportunity for me to brush on my product design skills and dig deeper into some of the technologies that I'm interested in such as Vuejs, AWS, Firebase, & MongoDB.

How did I build it?
The process for building such a project was a fun interesting journey, so go grab a cup of coffee/tea and get ready to jump into the brain of a designer and an engineer!
1: Research
Like most of my projects, I start with research, and for this particular project I wanted to do some research to figure out:
1 A: What are the other web apps in the market to create interactive gifs?
To my surprise, the majority of the apps I found were too complex for the average user to use to create a basic interactive gif.
This was a good sign for me. I figured that there might be a need in the market for a simple tool to generate these fun little interactive gifs!

1 B: What are the technologies I can use to build such an app?
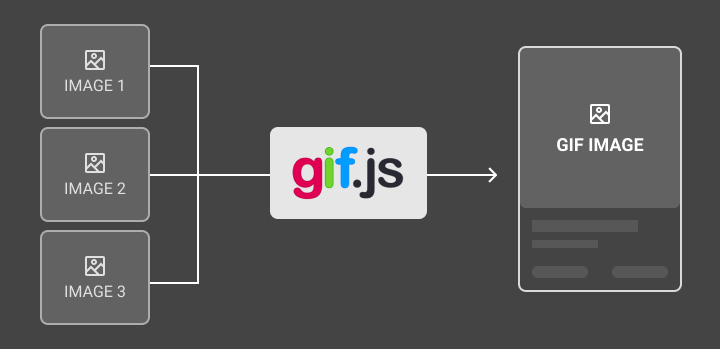
I wanted to see if it's possible for a website to generate gifs on the front-end (user's machine) without needing to send anything to a server.
After some digging around, I found a cool JS library called gif.js which allows you to generate a gif image from a set of images or canvas layers. This was the perfect tool I needed to build this project!
![]()
2: Prototyping a Proof of Concept
To make sure gif.js was going to for my project, I created a quick prototype to test it out.
Below is the first gif I generated using gif.js. It might look pretty simple to you, but for me, it was a great moment when I managed to get it to work!

It worked! — The prototype was clear evidence for me that this project is totally doable, and the only thing left I needed to test out, is generating a set of canvas layers from HTML. Then I can use those canvas layers as frames to create a gif. Keep reading and I'll explain all that in detail.
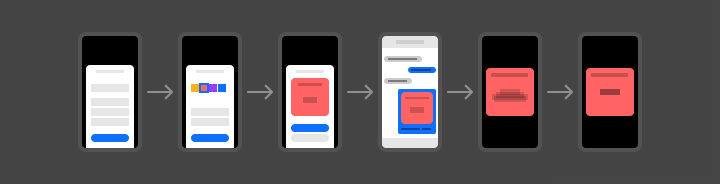
3: Main Flows & Wireframes
After I built that prototype I started thinking about the type of app I wanted to build. I wanted to build an app where people can create interactive quizzes which can be easily shared.
With that in mind, below are the flows I wanted to wireframe and map out to start designing my product:
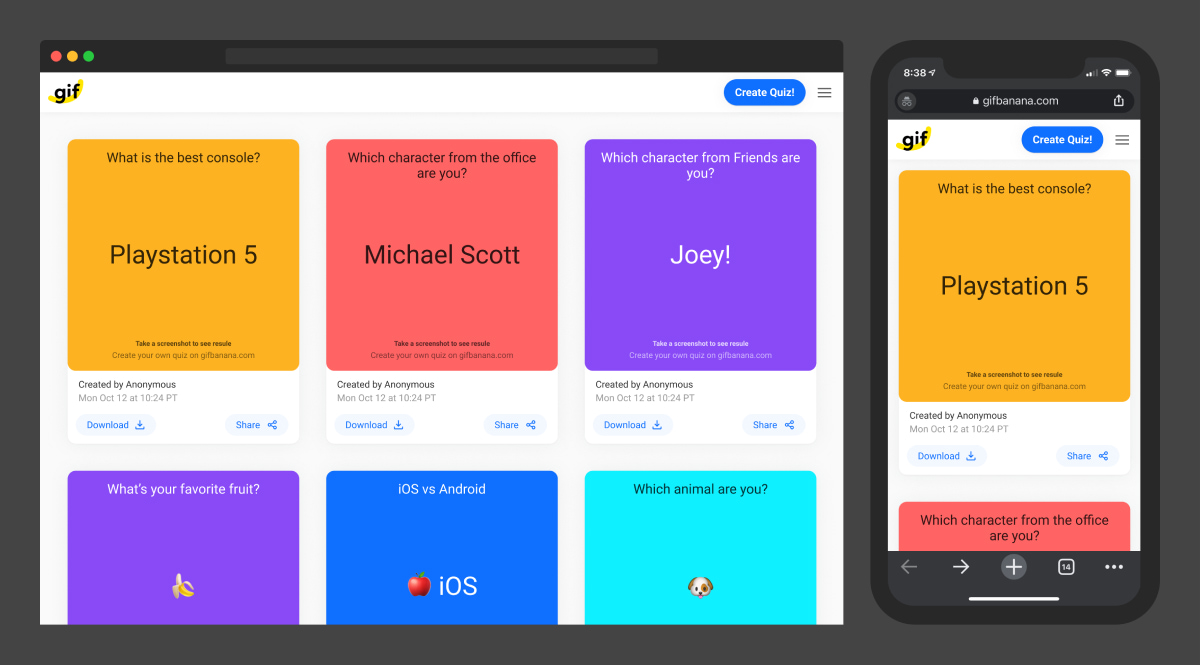
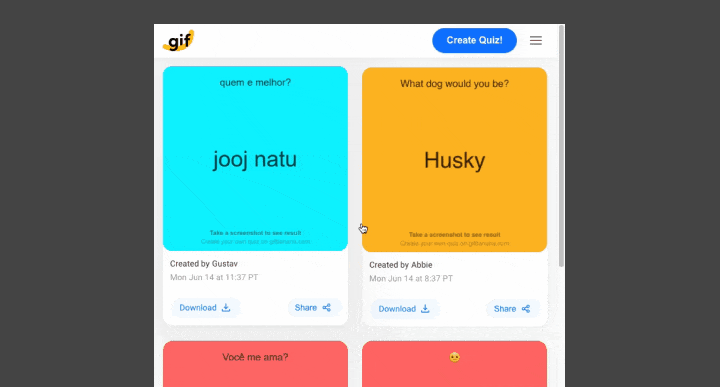
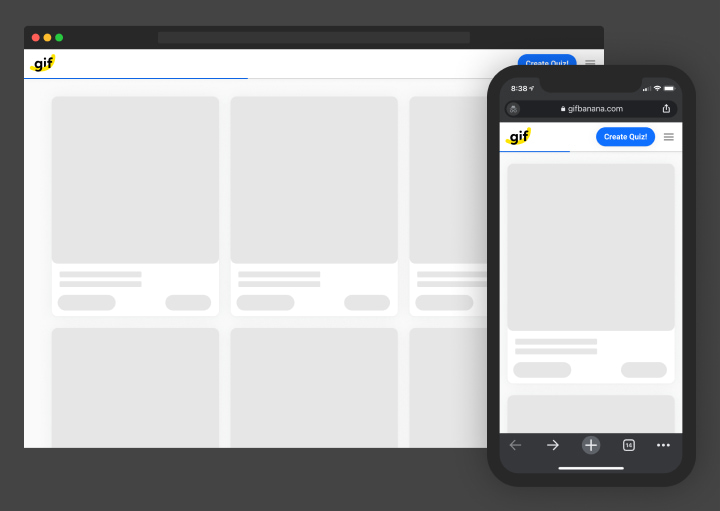
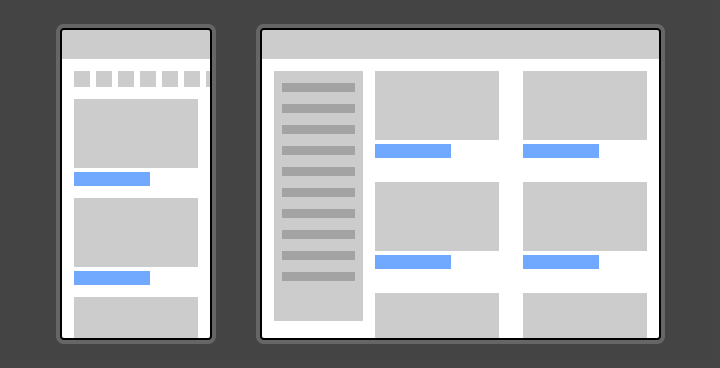
3A: Browse, download, and share all public quizzes
I wanted a way for anyone to be able to browse all the public gifs uploaded by any user.
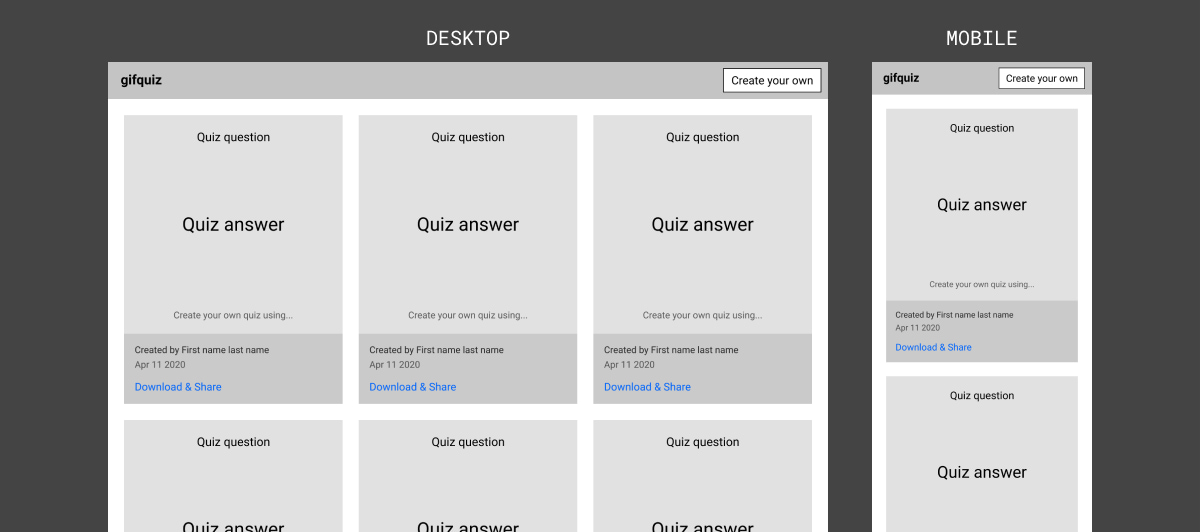
The quizzes are displayed in a basic grid layout, where each quiz can be easily shared and downloaded using the link below its creator details.
Clicking the Download & Share link would open the selected quiz in a modal where it can be downloaded and shared on different social media websites. Besides that, the user can choose to copy a direct link to the quiz on the site to share it on any other website.
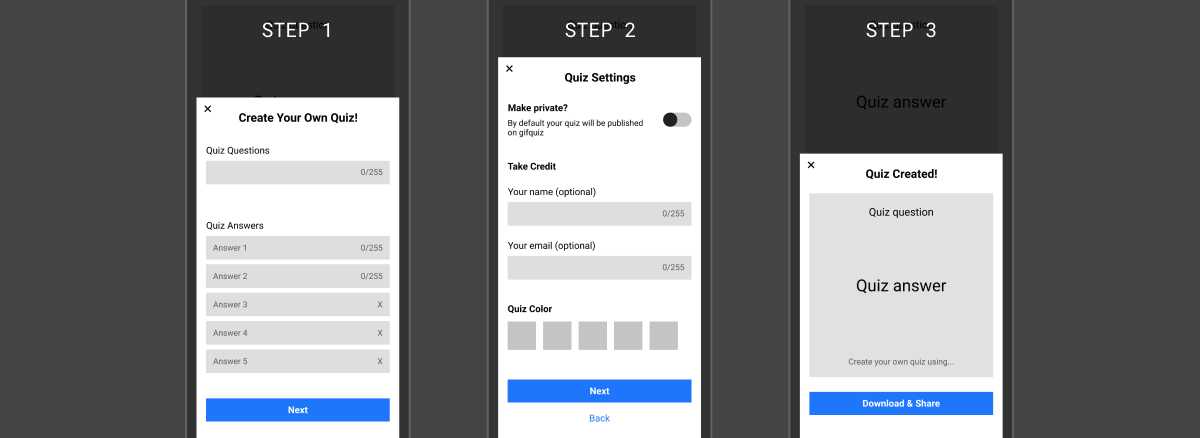
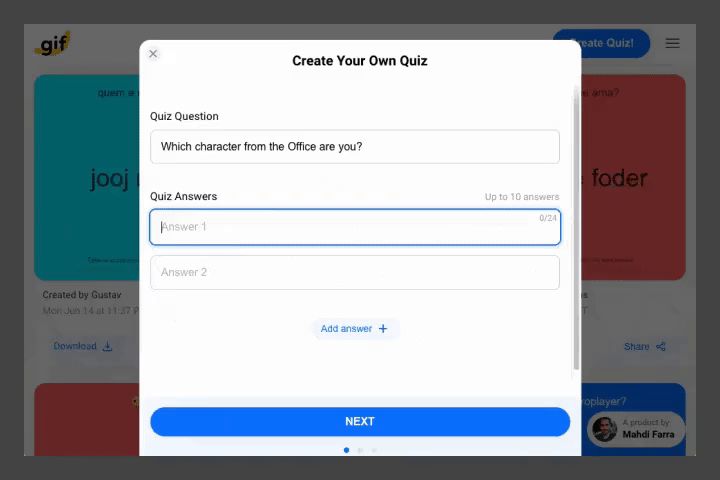
3 B: Creating a quiz and uploading it to the site
Creating quizzes is the main use case for the website. The quiz creation flow needed to be as simple as possible to make it really easy for anyone to create their own quiz.
The wireframes below are for the quiz creation flow, which starts by asking the user to enter a question and a list of answers, then choose quiz settings, and lastly, create and publish the quiz to the website.
4: Visual Design
Once I had the wireframes done and covered the basic functionality of the app, I started working on the visual details of the UI.
One important goal I had in mind while creating these designs, is that I wanted the app to work smoothly on mobile in a way that it'd feel a little like using a native app.
4 A: First Draft of Main Flows
I started by trying a few different styles and color variations, while at the same time, I wanted the design to be minimal and subtle to have the main focus on the quizzes rather than the UI.
Below is one of the first drafts I designed:

Once I was happy with the main visual feel and look, I created a few components and started using them as building blocks to build all the flows.
Now let's take a look at the final results!
4 B: Home Page & Navigation
In the first release of the website, I decided to keep the main navigation simple and only have one homepage, where all the public quizzes will be displayed sorted by their creation date and time.
A few of the details on the homepage and main navigation that are worth mentioning:
Inner Pages
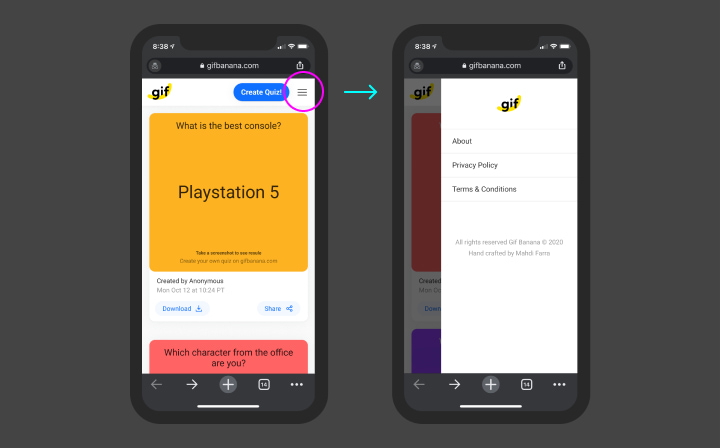
The website will have 3 inner pages (About, Terms & Conditions, & Privacy Policy). These pages needed to be accessible from any place on the website. To do that, I added a menu button in the header, which can be clicked to open a side menu with links to these 3 pages.
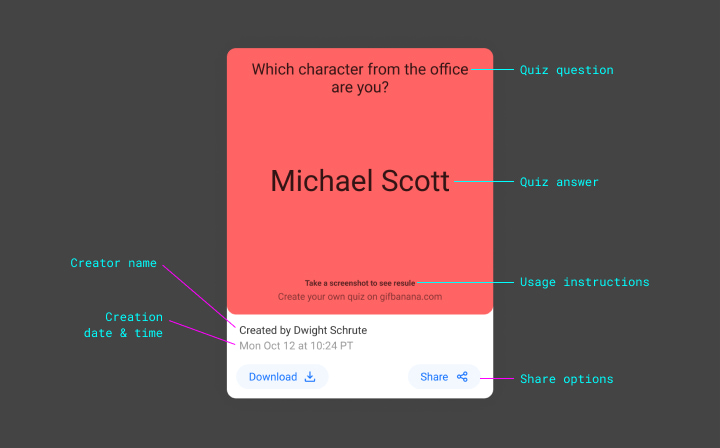
Quiz Card
Each quiz card has download and share buttons, the creation date and time, and the details of the creator if they were provided.
Besides that, on the quiz gif there's a one-line instruction for how to interact with the quiz. Which is super important to teach people who aren't familiar with these kind of quizzes.
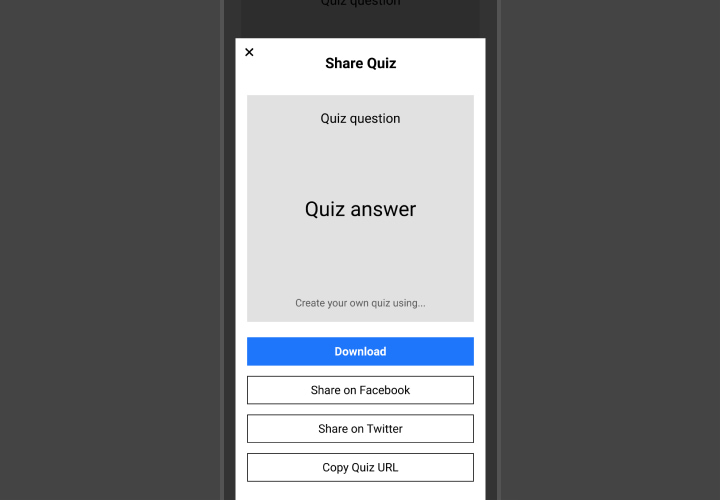
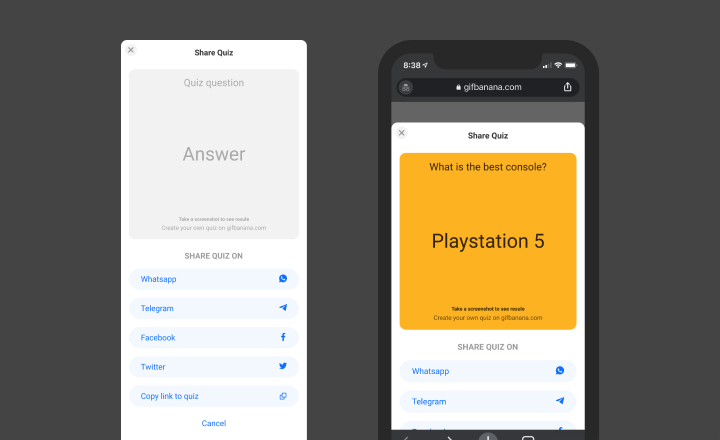
Share Sheet
Clicking or tapping the share button would open a share sheet with various options for sharing the quiz on social media and messaging apps, as well as an option to copy the URL of the quiz to share on any other website.
Card Transition
Quiz cards have smooth subtle hover and active effects, which help make it clear to the user that they're clickable.
Infinite Scrolling
This makes it super easy for anyone to browse as many quizzes as they wish to by simply scrolling the page.
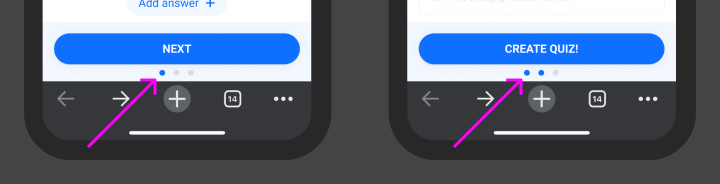
4 C: Quiz Creation Wizard
The process for creating a quiz must be simple and straightforward. To achieve that, I split the flow into 3 steps, which help the user focus on one task at a time.

Let's go through some of the design details and decision made in this flow:
Steps Indicator
Setting the right expectations for the user is an important UX principle, and because the quiz creation wizard had multiple steps in it, I needed a way to show the user how many steps are in the wizard. This can be achieved in a few different ways, and I choose to use dots as an indicator for those steps.
Adding & Removing Answers
By default, the first step in the quiz creation wizard only asks for 1 question and 2 answers, which is the minimum number of answers needed to create a quiz. At the same time, there is a clear call to action on the screen to add more answers.
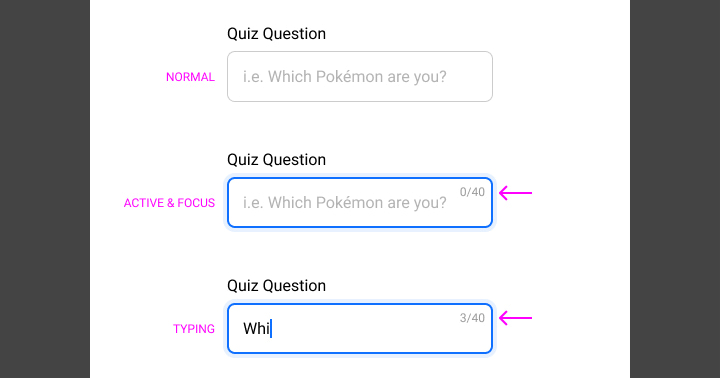
Input Boxes
The input boxes for the quiz question and answers have a character limit that only appears when the input is active (in the right context). The character limit is added to help make the quizzes look consistent, and to prevent the design from breaking.
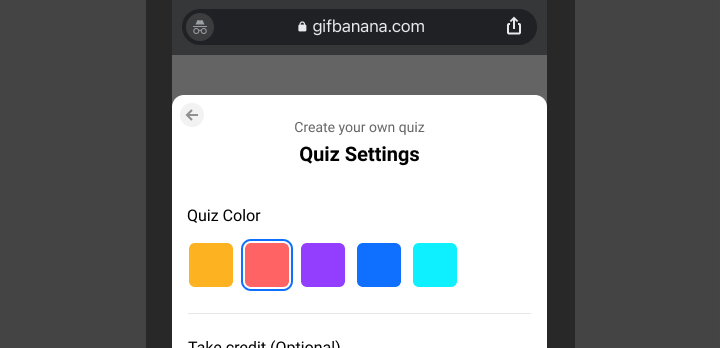
Choosing Colors
To add a level of customization to each quiz, I added an option to choose the background color of the quiz from a set of predefined colors.
By default, a random color is selected every time the creation modal is opened. This helps make sure there is a variety of quizzes with different background colors, even if the user decided not to ignore this setting.
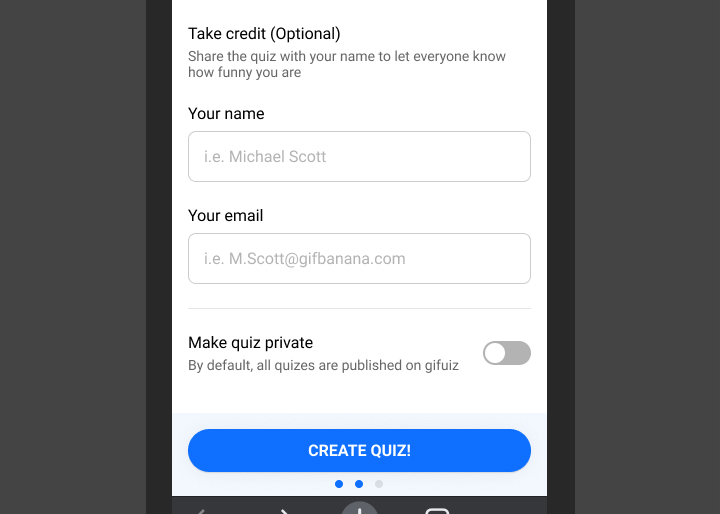
Publishing Settings
Each quiz created in Gifbanana can be signed by the creator's name and email, and of course, can be marked as private if the creator didn't want it to be published.
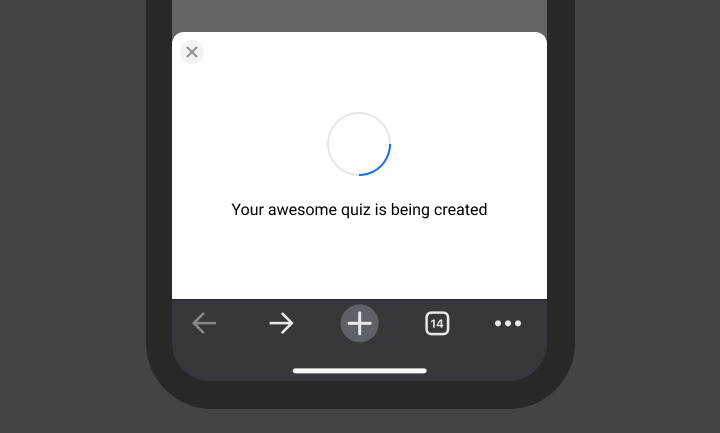
Creation Loading State
When a quiz is being created, a lot of things need to happen in the background, like uploading the gif to the server and adding its details to the database, which can take a few seconds to complete.
While the quiz is being generated a loading spinner would show up, which would help the user understand that the app is still working on generating the quiz.
Success Screen
Once the quiz is created, the generated gif image would appear, followed by one call to action for downloading the quiz, and secondary one for sharing it.

4 D: App Name & Logo
The first name I choose for this project was Gifuiz which is a play on words by combining gif + quiz. However, this name wasn't great. I wanted a generic name that is easier to pronounce, so that in the future if the app had other features I wouldn't need to rename it.
![]()
After playing with a few words and checking a ton of domain names I settled on Gif Banana! I choose Banana as the second part of the name because pealing a banana reveals the delicious fruit, and in a way that's similar to pausing a gif to reveal an answer!
![]()
4E: Animation & Transitions
When transitions and animations are added carefully they can add some delight to the user experience. For that reason, I've added a few subtle transitions in different areas of the app to help smooth out the experience and make it more delightful.
A good example of a well-thought transition is the way the creation modal eases in from the bottom of the page, and at the same time, a black overlay covers the page in the background, to separate the modal from the content in the background.


Another example of that is the subtle hover and active states for all the buttons, and inputs.

4F: Loading States
As mentioned earlier, the app does a few server requests to fetch the quiz gif images, and this can take a couple of seconds depending on the internet connection.
While the user is waiting for the content to load they'll see a few different loading indicators and states, which would make it clear that the app is fetching the data in the background.
Below are a couple of examples of those loading states, and indicators:
Main App Loading Indicator — The initial state when the app is being loaded for the first time.
Infinite Scrolling & Loading Skeletons — To make browsing quizzes as seamless as possible, I decided to make the app show more quizzes as you scroll through the page, similar to most social networks.
While scrolling, loading a new set of quizzes can take a couple of seconds, and when that's happening in the background the user will see skeletons of the quizzes being fetched from the database.
4G: Handling Error
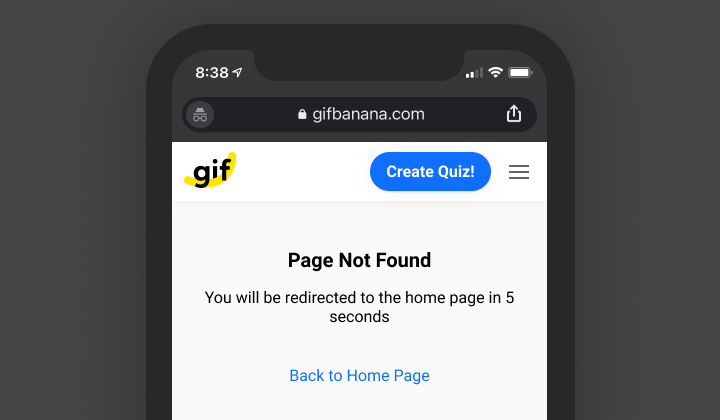
404 Page — Initially the app only had a 404 error page for the cases when a user follows a broken or an link.
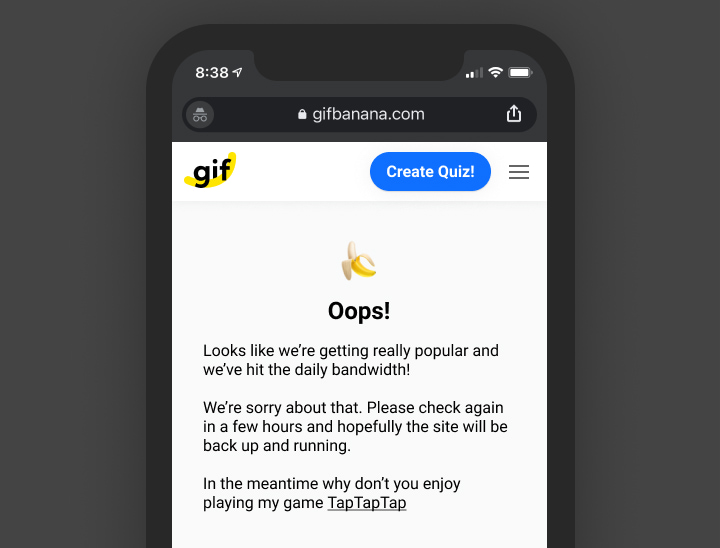
Daily Bandwidth — However, soon after I launched the app, I started getting more and more traffic to the point where I had all my daily download bandwidth for the gif images consumed in less than 12 hours!
When this happened the website wasn't able to display any gifs, and there wasn't any indicator on the page why none of the quiz images were loading! To help clarify the situation to my users I decided to create a page that will automatically show up when the daily download bandwidth is consumed.
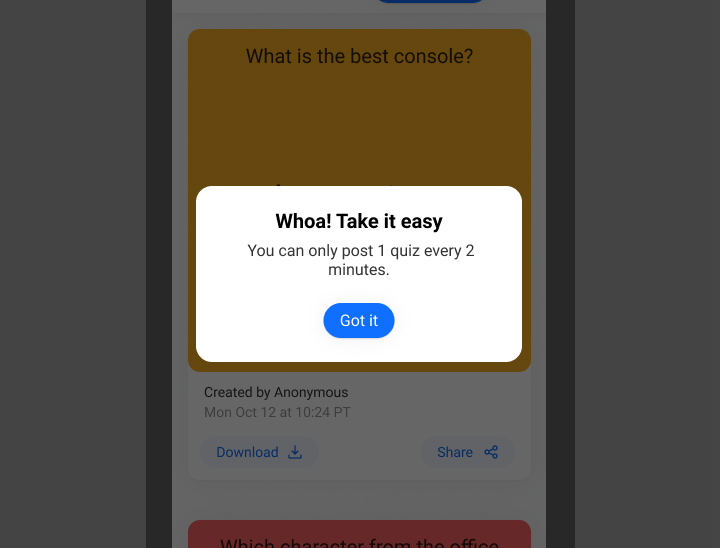
Spam Control — To help reduce the amount of spam and to give every user a chance to have their quiz show up on the homepage, I set a limit to only allow users to create 1 quiz every 2 minutes. So when a user tries to post a second quiz in less than 2 minutes they'll get an error message telling them to wait a couple of minutes before they try again.
5: How Should it Work?
With the design ready I was ready to build things in code. But before I do that, I needed to decide on how exactly the app will work.
There are many ways for such a project can be built in, but due to my knowledge in front-end engineering and JS specifically, this is how I thought Gifbanana should work on a high level:
5A: Loading Quizzes
When the app is loaded it'll make an API call to the database to fetch all the quizzes, including the gif images locations as they'll be stored separately. Once the details for the quizzes are received, they get displayed on the page.

5B: Creating a Quiz
This is where most of the logic in relies in the app.
To create a quiz, the user would fill out the quiz details, choose some settings, and then the quiz will be generated on the front-end.
Once the quiz gif is generated, it'll be auto-uploaded to the server along with its details to be saved in the database.
When all that is completed successfully, the uploaded quiz gif will be displayed to the user which they can be downloaded and shared.

Next, I'll be walking you through my process and thoughts on choosing the right technology for this project.
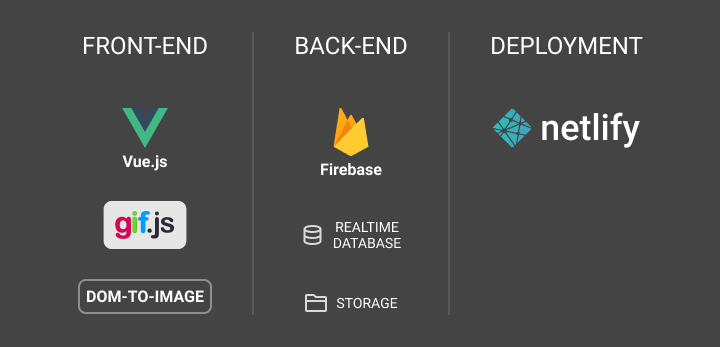
6: The Building Technology
Usually, when I'm building a new project, I choose new technologies that I might not be very familiar with, which is a great and fun way I found to learn new things!
6A: Front-End Framework
In the past, most of my projects were coded in vanilla HTML, CSS, and Javascript. However, as for this project, I wanted it to be my first experience working with a Javascript framework since I've read a lot on how that could improve my workflow to be more efficient.
I needed a framework to build a multiple-page app, with components that can be used as building blocks in different areas inside the app.
To decide on which Javascript framework I should use, at first, I looked at the top 3 Javascript frameworks based on the number of stars on Github:
![]()
Then I did more research to better understand the pros and cons of each framework, and after a lot of considerations, I decided to go with Vue.js. It was my favorite choice for the following reasons:
- Great syntax where you write normal HTML and have your Javascript separate from it for better readability.
- Awesome documentation, great community, and easy to learn.
- Small size and great performance.
![]()
6B: Supporting JS Libraries
Based on what I mentioned earlier, the plan was to generate the quiz gif on the client-side (in the browser). And to do that, I needed to figure out a way to generate a gif from either a set of images or a set of HTML DOM element.
1: Compiling a gif image
Luckily, I was able to find a library that is capable of compiling a gif image from a set of images or canvas elements. The library is called Gif.js which is the one I used to create the initial prototype at the beginning of the project.
2: Converting a DOM element into Canvas
Now that I had a library to compile a gif from a set of images or canvas elements, I needed another library to convert an HTML DOM element into a canvas or an image.
Luckily, I've worked on a project in the past that had this exact functionality in it. The library used in that project is called dom-to-image.

Dom-to-image is not the only library that can convert a DOM element into a canvas/image, there's another one called HTML2Canvas. However, after testing both libraries for this project, I found out that dom-to-image works more accurately, and performs slightly better for my specific use case.
6B: Database & Backend
With the front-end tech stack ready in place, it was time to decide on the backend solution to use for this project. I needed backend support for 2 main things:
- Database: to store the quiz data submitted by the user (name, email, date & time).
- File Storage: to store the generated quizzes gifs.

I started my research journey by checking out MongoDB for the database, and Amazon S3 for the file storage.
I spent a fair amount of time going through the rabbit hole of reading about both of the technologies, which I really liked. However, I found Amazon's documentation wasn't the greatest, and also, to be able to use their S3 service I'd need to write my API, which might not be the most fun task. This also meant I wouldn't also be able to use MongoDB as it needs some prior knowledge in AWS.
![]()
For that reason, I decided to look for alternatives, and Google Firebase was at the top of my list based on a lot of recommendations.
Turns out, Firebase had a lot of awesome products that would do everything right out of the box, and would also take care of all the ugly parts of managing a server and all the backend-related tasks. Besides all that, Firebase is also known for:
- Having great documentation.
- Easy to learn.
- Quick and easy to setup and can used in app with just a few lines of code.
- Great security features built-in.

Based on that I decided to use Firebase Realtime Database to store quiz data and Firebase Storage to store quiz gifs.
Firebase Security Rules
A cool thing worth mentioning about using Firebase is that it gives you a lot of control over who has access to your database, and files in an easily configurable way. And of course, the documentation for this is very clear and has a lot of useful examples for things that you can do with it, such as limiting the size of the uploaded file or even restricting the supported file formats.
6C: Hosting & Deployment
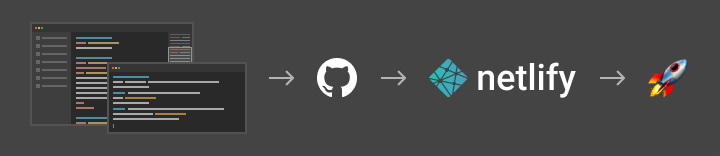
Once I had most of the tech stack pieces figured out, I start looking for deployment and hosting services. The top 2 options that came to mind were Vercel and Netlify. And since I already had a great experience using Netlify, I decided to stick with it for this project.
Netlify's is awesome and easy to use, and all you need to deploy a website is to connect your Github / Gitlab account to Netlify, provide Netlify with the build command for your app, and finally, once you push your code to Github, Netlify will automatically run the build command and deploys your website.
6D: Tech Stack Overview
Finally, I was able to draw the full picture of the entire app and how it'll work on the front-end and the back-end.
7: Launching the App!
Coding the app was a fun interesting journey that took me around 6 months, during which I've learned a ton of things in Vue.js, Firebase, AWS, and many other cool technologies.
7A: Beta Launch
After I was done working on the app I needed to test it out with a few friends to make sure everything is working well.
To do that, I deployed the first version of the app on Netlify, but I made the app locked by default, and created a smart fun way to activate it!
The secret way for opening and using the app is a way to make people testing it feel special and being rewarded for testing the app.
To open the beta version of the app, the user had to do the following:
- Click the logo 10 times until a dialog shows up on the screen asking for a secret code.
- Enter the secret code I sent you earlier.
- The app will be unlocked for you for 10 minutes!
Aside from that, I thought that this secret way for opening the app could be a nice fun challenge for anyone who knew about the app but didn't receive the instructions for unlocking it.
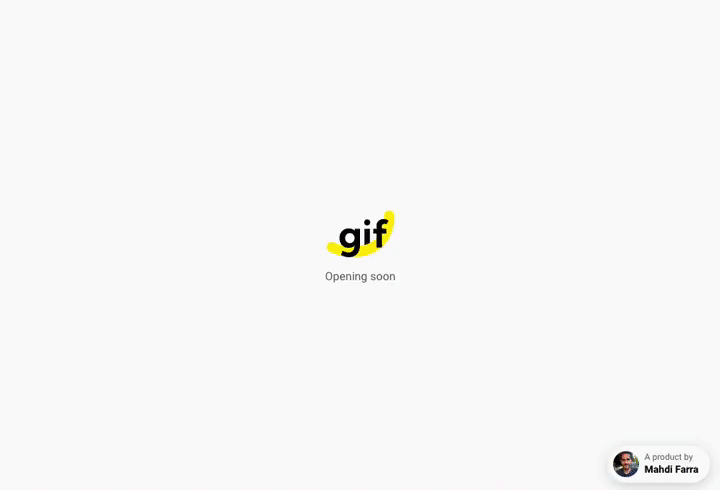
The gif below is showing how unlocking the app worked.
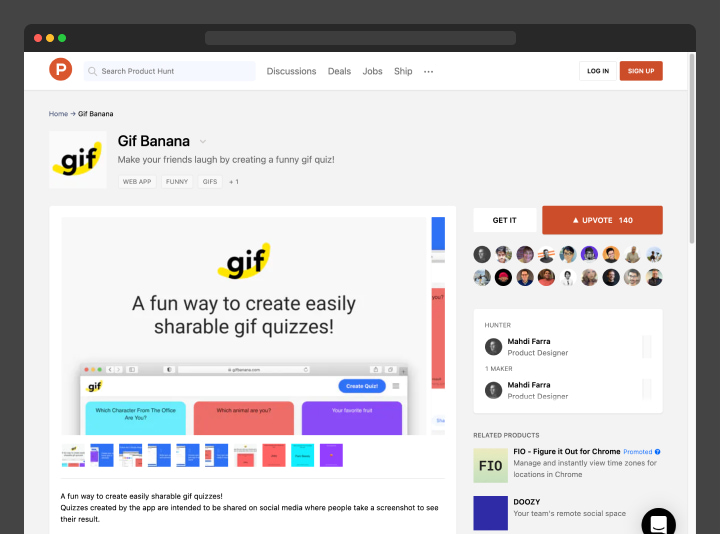
7B: Launching on Product Hunt
Launch it on Product Hunt or it didn't happen! Launching on Product Hunt is super important to get some exposure, and to make an announcement when your product is launched.
Based on my previous launch experiences, I found out that the better screenshots and descriptions you have, the higher the chance people will check your product and give it a try.
For that reason, I crafted high-quality screenshots showcasing the app's main functionality with a couple of fun quiz examples created using the app.
A lot of people checked the app on the launch day, and a lot of them voted for it—140 votes on Product Hunt.
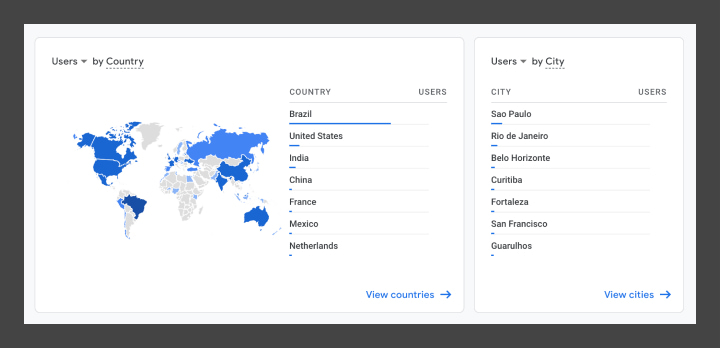
Going Mini-Viral in Brazil
A couple of weeks after I've launched the app while checking it casually I noticed that it wasn't working well. I look at the analytics and noticed a ton of traffic from Brazil to the point where I had all my Netlify's daily download bandwidth consumed!
I looked for the source of this, and I found a Brazilian Tumbler blog where someone mentioned the website and how it can be used to create fun gif quizzes.
Currently, the majority of the traffic I get on the website is originated from Brazil, and that's why also most of the recent content is in Portuguese.

Lessons Learned
Working on a project at this scale was a fun way to learn a lot of great technologies, and has taught me a lot of valuable lessons. Below are the highlights of the lessons that I've learned:
1: Website Wasn't Self-Explained
A lot of the early users didn't understand the idea behind the website. To solve that issue, I added an explanation on the About page with a few use cases and a quiz example.
However, I think this is still not enough. The about page is hidden in the side menu and a lot of people will definitely miss that. In the future, I should add a link to the instructions page right on the homepage.
2: Moderation is Challenging
In the beginning, I was moderating all the quizzes posted to the website by hiding the ones with inappropriate language, but once the site grew in popularity moderation became more and more challenging.
To solve this in the future, I'll create a moderation dashboard where I can see and manage all quizzes quickly, instead of relying on Firebase's dashboard, and later on, I can look at more sophisticated solutions like using ML to automate parts of the process.
3: Not Enough Data Analytics
The website is only using Google Analytics without any events, which means I only get basic usage data without understanding a lot of details, such as, why and where do users drop off.
In the future, I will add events tracking to different areas in the app to help answer some of these questions, and to help me improve the app's user experience in general.
Besides that, I need a way for the users to share their feedback and ideas to help improve the product.
Future Improvements
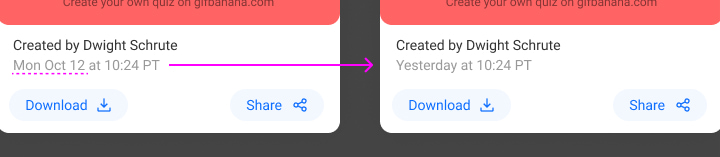
1: Use Human-Readable Dates
Right now, quiz timestamps are in the Pacific timezone (PT), and that's no relevant to all the users who aren't in that timezone. To solve this issue I'm going to use Moment.js which is the most popular JS library for formatting dates and times.
2: Featured Posts Section
Currently, all public quizzes are automatically displayed on the homepage. However, this means anyone could post a gif with inappropriate language that is visible to everyone to see on the homepage!
This is a big challenge I'm facing right now, and part of the solution would be to have the default homepage be only for the featured posts which I would handpick, and then have a secondary section for all created quizzes sorted by creation time.

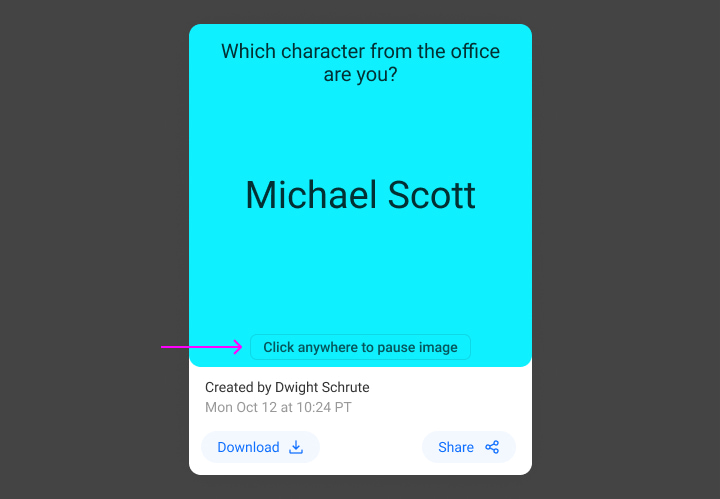
3: Add the Ability to Play/Pause Gifs
Currently, the only way to see a quiz answer you must take a screenshot of the quiz. A better way to do it would be to add a way to play/pause the gif right in the browser.
This can be simply done by making the gif image clickable, where the animation would pause on click and would continue playing on the second click.
4: Translations
Since the majority of the users are coming from Brazil, it'd make a lot of sense to have the website support their native language (Brazilian Portuguese).
And later on, once I have the support for multiple languages on the website, I could easily get it translated to other languages.

5: Complete rewrite in NuxtJS
While I've enjoyed developing the app in Vue.js, I think it can be improved even further by using NuxtJS, as it has a lot of features that make things easier to develop, like the ability to add meta tags to improve the website's SEO.
At the same time I will do some refactoring to the code and will use Vuex for state management.

Final Thoughts
How much did launching this project cost me?
If you're wondering, this website did not cost me a single dollar except for the domain name $12—which is unnecessary if you just want to get your project launched; you already get a sub-domain from Netlify for each project you have in there.
That being said, the actual cost for this project was my time and energy working. But I personally consider that a fun way to learn new things, so it's still kind of free. And I would actually argue that the stuff I've learned is super valuable!

What are You waiting for?
Now that you know that you can launch a similar project for free, what are you waiting for to start working on your idea?
Now is the best time to create and launch new ideas. There are a ton of free tools and resources available for everyone to learn and create, and most of them are either free or pretty cheap!
I totally believe you. You can do it!

I hope you've enjoyed reading my story!
I would love to hear yours and what kind of projects you're building or want to build — 👋 Let's connect on Twitter @mahdif
Share = 💞
If you liked the article please share it with others on Twitter & other social networks! I would really appreciate that.